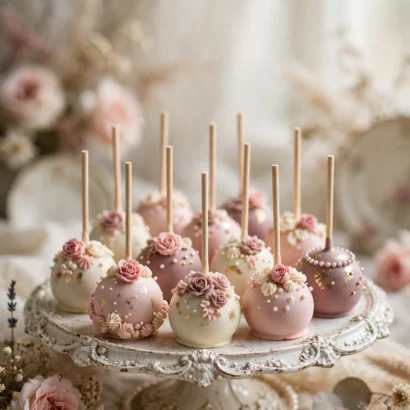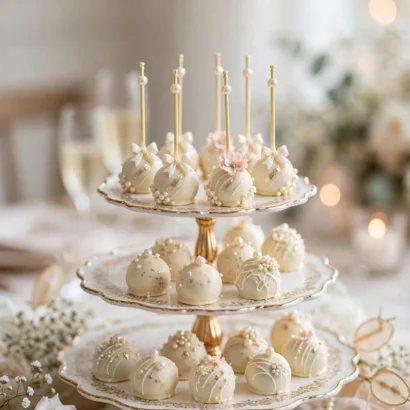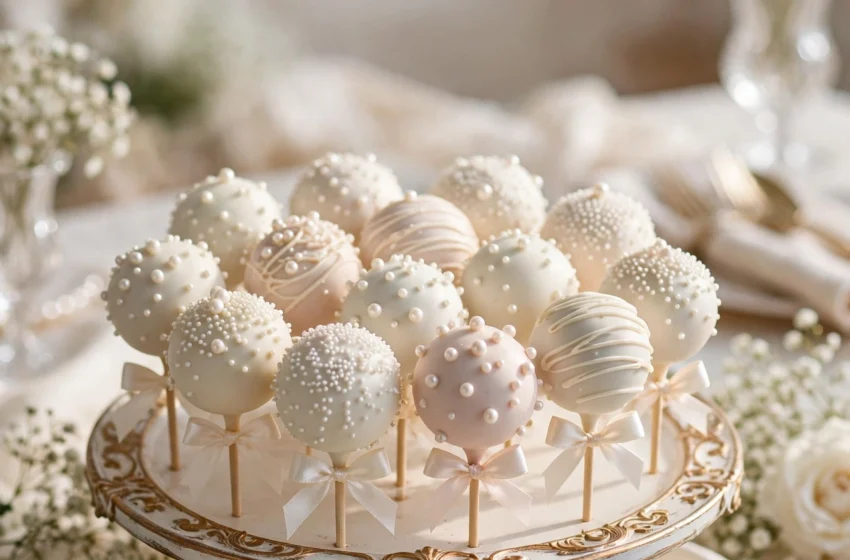
Cake pops don’t have to look like casual children’s party treats. With a smooth white coating, delicate edible pearls, and a few carefully chosen bridal details, they can become elegant little desserts worthy of a wedding celebration.
These pearl wedding cake pops start with a simple boxed vanilla cake and frosting, then transform into sophisticated wedding desserts with ivory or white candy coating, pearl sprinkles, tiny bows, and optional gold or silver accents. Their small size makes them easy to display, package, and serve.
They’re especially beautiful for weddings and bridal showers, but they also work for engagement parties, rehearsal dinners, anniversary celebrations, and elegant afternoon teas. You can keep the design classic with white and pearl or customize the colors to coordinate with your wedding palette.
Whether you’re creating a dessert table or looking for a homemade wedding favor, these pearl wedding cake pops offer a simple way to add a polished, personal touch to your celebration.
What Are Pearl Wedding Cake Pops?
Pearl wedding cake pops are traditional cake pops styled specifically for weddings and other elegant celebrations. Their defining feature is the combination of a smooth white or ivory coating with delicate pearl decorations.
The basic design can include:
- White or ivory coating
- Edible pearl sprinkles
- White or fondant bows
- Lace-inspired details
- Tiny edible flowers
- Gold or silver accents
- Coordinating ribbons
The style can be minimalist or elaborate. A simple white cake pop with one pearl detail can look incredibly elegant, while a more decorative version might feature clusters of pearls, a miniature bow, and a subtle gold accent.
Because the color palette is easy to customize, pearl cake pops can complement almost any wedding theme.
Why You’ll Love These Wedding Cake Pops
Elegant and Sophisticated
The combination of white coating and pearls creates an instantly bridal appearance. The finished cake pops look polished without requiring complicated decorations.
Easy to Customize
Change the coating, pearls, ribbon, or accents to coordinate with the wedding colors.
Perfect for Dessert Tables
Arrange them on a tiered stand alongside cupcakes, cookies, macarons, or the wedding cake.
Great for Bridal Showers
Pearl cake pops are especially pretty for bridal showers because they can be customized with the bride’s preferred colors.
Can Double as Wedding Favors
Individually package each cake pop in a clear food-safe bag or small favor box and finish it with a ribbon.
Easy to Match to Your Wedding Colors
White and pearl are timeless, but you can add blush, champagne, gold, silver, lavender, or another accent color to create a coordinated look.
Ingredients You’ll Need
For the Cake
- 1 box vanilla cake mix
- Ingredients required on the cake-mix package
- Vanilla frosting
A boxed vanilla cake mix makes this recipe approachable and convenient. The mild flavor also works beautifully with the elegant appearance of the decorations.
For the Coating
- White candy melts
- Ivory candy melts
- Optional chocolate coating for additional variations
White creates a crisp bridal appearance, while ivory gives the cake pops a softer, warmer look.
For Decoration
- Edible pearl sprinkles
- White sprinkles
- Fondant
- Miniature edible bows
- Optional edible gold accents
- Optional edible silver accents
- Optional tiny edible flowers
Use lightweight decorations whenever possible so they don’t make the cake pops difficult to handle.
How to Make Pearl Wedding Cake Pops
1. Bake the Cake
Prepare the vanilla cake mix according to the package directions.
Bake the cake until done, then allow it to cool completely before making the cake-pop mixture.
A completely cooled cake is important because warm cake can make the mixture soft and difficult to shape.
2. Crumble the Cake
Break the cooled cake into pieces and crumble it into fine, even crumbs.
Remove any unusually hard pieces so the finished cake pops have a smooth texture.
3. Add the Frosting
Add vanilla frosting gradually and mix thoroughly.
You want enough frosting for the crumbs to hold together when pressed, but not so much that the mixture becomes sticky or overly soft.
Adding the frosting little by little gives you better control over the texture.
4. Shape the Cake Pops
Roll the mixture into evenly sized balls.
For a wedding dessert table, consistency is particularly important. Cake pops that are approximately the same size will look much more polished when arranged together.
A small cookie scoop or kitchen scale can make portioning easier.
5. Insert the Sticks
Melt a small amount of your candy coating.
Dip the end of each cake-pop stick into the melted coating, then gently insert it into the center of a cake ball.
The coating helps anchor the stick inside the cake pop.
6. Chill the Cake Pops
Place the cake pops on a lined tray and chill them until firm.
Chilling helps them hold their shape during dipping, but avoid leaving them extremely cold if you’re going directly into warm coating.
7. Dip in White or Ivory Coating
Melt the white or ivory candy coating according to the package instructions.
Dip each cake pop until completely covered. Lift it out and allow the excess coating to drip back into the bowl.
Gently tap the stick to help remove excess coating.
Place the cake pops upright while the coating sets.
For the smoothest finish, avoid repeatedly stirring or overheating the coating.
8. Add the Edible Pearls
Add the pearls while the coating is still slightly soft so they adhere to the surface.
You can place one pearl near the center, create a small cluster, or make a delicate border.
For a refined wedding design, resist the temptation to cover every inch of the cake pop. A few strategically placed pearls can have a more sophisticated effect.
9. Add the Final Bridal Details
Once the basic pearl design is finished, add optional details such as:
- Miniature white bows
- Tiny flowers
- White drizzle
- Gold accents
- Silver accents
- Lace-inspired fondant pieces
Keep the finishing touches consistent across the batch for a coordinated wedding display.
How to Make Cake Pops Look Elegant for a Wedding
Elegance often comes from simplicity rather than excessive decoration.
Start with evenly sized cake pops and a smooth coating. Then choose one main decorative feature—such as pearls—and one or two supporting details.
A coordinated color palette also makes a major difference.
Matching the cake-pop decorations with the wedding invitations, flowers, ribbons, table linens, or wedding cake can make homemade desserts look like part of a professionally designed dessert table.
White and Pearl
A classic bridal combination. Use white coating with edible pearls and minimal additional decoration.
Ivory and Champagne
Warm ivory coating with champagne-colored details creates a sophisticated, romantic appearance.
White and Gold
White cake pops with subtle gold accents are perfect for a glamorous wedding.
Blush and Pearl
Add soft blush pink details to create a romantic wedding or bridal shower design.
White and Silver
White coating, pearls, and silver accents work especially well for modern or winter weddings.
Pearl Wedding Cake Pop Decorating Ideas
Classic Pearl Cake Pops
Keep the design simple with a smooth white coating and one or several small pearl details.
This is an excellent choice for a minimalist wedding.
Full Pearl Cake Pops
Create a more decorative appearance by arranging clusters of tiny edible pearls across the surface.
Use a restrained pattern rather than trying to cover the entire cake pop randomly.
Pearl and Bow Cake Pops
Add a miniature white fondant bow to the pearl-covered cake pop.
This design has a charming bridal-favor appearance and looks particularly pretty when finished with matching ribbon.
Pearl and Flower Cake Pops
Add a tiny edible flower beside the pearls.
For a romantic garden wedding, use white or blush flowers with small green leaves.
Gold Pearl Cake Pops
Use white or ivory coating with pearls and just a few edible gold accents.
Gold works best as a finishing detail rather than the dominant color.
Pearl Cake Pops for Different Wedding Styles
Classic Wedding
Choose white or ivory coating, white pearls, and simple ribbons.
This timeless combination works with almost any traditional wedding palette.
Romantic Garden Wedding
Combine pearls with blush flowers and delicate greenery.
A mixture of ivory, blush, and soft green creates a natural floral feel.
Vintage Wedding
Add pearl details, lace-inspired decorations, muted colors, and small bows.
Soft ivory and dusty rose can give the cake pops a nostalgic appearance.
Modern Wedding
Keep the design minimalist.
Use smooth white cake pops with a small number of carefully positioned pearls and no unnecessary decoration.
Luxury Wedding
Combine pearls with subtle gold accents, sophisticated packaging, and a carefully styled dessert display.
Winter Wedding
Use white, ivory, silver, and pearl details.
A little silver sparkle can complement a winter wedding without overwhelming the clean white design.
How to Display Pearl Wedding Cake Pops
The display can make just as much difference as the cake pops themselves.
Cake Pop Stand
A tiered cake-pop stand creates height and makes the individual desserts easy for guests to see and reach.
Choose a stand that complements the wedding’s overall style.
Dessert Table
Arrange the cake pops alongside the wedding cake and other desserts.
Keep similar colors together so the display feels cohesive rather than crowded.
Individual Favor Boxes
Place one or two cake pops inside small food-safe favor boxes.
Finish the box with ribbon in one of the wedding colors.
Mini Gift Bags
Clear food-safe bags allow guests to see the pearl decorations.
A simple ribbon or personalized tag can turn the cake pop into an attractive wedding favor.
Place Settings
Individually packaged cake pops can be placed at each guest’s seat.
They can serve as both a dessert and a small favor.
Dessert Bar
Place the cake pops alongside cookies, cupcakes, macarons, and other wedding party desserts.
Using matching ribbons, flowers, table linens, and cake colors helps everything look intentionally coordinated.
How to Package Cake Pops as Wedding Favors
Cake pops make charming favors because they’re already individually portioned.
For a simple presentation:
- Allow the coating and decorations to set completely.
- Place each cake pop in a food-safe clear bag.
- Secure the bag with ribbon.
- Add a small personalized tag if desired.
- Coordinate the ribbon with the wedding colors.
For a more luxurious presentation, place individual cake pops inside small favor boxes lined or designed to protect the decorations.
If the cake pops need refrigeration because of their ingredients, make sure the packaging and storage conditions are appropriate before placing them on display.
Tips for Perfect Wedding Cake Pops
How Do I Prevent Cracks?
Avoid extreme temperature differences between the chilled cake pops and melted coating.
Very cold cake pops dipped into significantly warmer coating can develop cracks.
Why Do Cake Pops Fall Off the Sticks?
The cake mixture may be too soft, or the stick may not be secured properly.
Dip the stick tip into melted coating before inserting it into the cake ball, and avoid adding excessive frosting to the cake mixture.
How Do I Get a Smooth White Coating?
Melt the candy coating gently according to its package directions.
Avoid overheating it, and stir until smooth before dipping.
If the coating is too thick, use a candy-coating thinning product if recommended by the manufacturer.
How Do I Attach Edible Pearls?
Add the pearls while the coating is still slightly soft so they can adhere to the surface.
For decorations being added after the coating has set, a small amount of melted candy coating can work as edible glue.
How Do I Keep All the Cake Pops the Same Size?
Use a cookie scoop or kitchen scale to portion the cake mixture.
Uniform sizing is especially important for weddings because it gives the dessert display a professional appearance.
How Far Ahead Can I Make Wedding Cake Pops?
You can prepare them in stages before the wedding.
The cake balls can be prepared ahead, while delicate decorations can be added closer to the event.
Always consider the storage requirements of the particular cake, frosting, coating, and decorations you’re using.
How Do I Transport Cake Pops to a Wedding?
Keep the cake pops upright in a sturdy container designed to prevent them from rolling or touching one another.
Protect delicate pearls, bows, and flowers from pressure.
Transport them in a cool environment and avoid leaving them in direct sunlight or a hot vehicle.
How to Store Pearl Wedding Cake Pops
Storage requirements depend on the ingredients used, particularly the frosting and other perishable components.
Room Temperature
If all ingredients are suitable for room-temperature storage, keep the cake pops covered in an airtight container in a cool, dry location.
Keep them away from direct sunlight and heat.
Refrigeration
If the cake pops contain ingredients that require refrigeration, store them in a covered container in the refrigerator.
Allow them to warm gradually before displaying them.
Freezing
Plain cake pops are generally easier to freeze than fully decorated cake pops.
Wrap them securely and place them in an airtight freezer-safe container.
Thaw them gradually before decorating or serving.
Protecting the Decorations
Pearls and delicate bows can be damaged if cake pops are stacked or packed too tightly.
Give decorated cake pops enough room so the decorations don’t press against other surfaces.
Preventing Condensation
When refrigerated or frozen cake pops warm up, condensation can form on the coating.
Keep them covered while they gradually come toward room temperature to help reduce moisture exposure.
Can You Make Wedding Cake Pops Ahead of Time?
Yes. Preparing wedding cake pops in stages can make the days leading up to an event much less stressful.
1 Day Before
The day before the wedding, you can finish the cake pops, decorations, and packaging if your ingredients allow for this storage period.
Keep everything protected until it’s time for the dessert table.
2–3 Days Before
For a longer preparation window, consider making the cake balls and decorations separately.
Store them according to the requirements of the ingredients and assemble the finished cake pops closer to the event.
Freezing the Cake Balls
For longer-term preparation, freeze the cake-pop base before adding delicate decorations.
Thaw gradually and make sure the surface is dry before applying the final coating and decorations.
When to Add the Pearls
Pearls can be added while the coating is still slightly soft.
If you’re preparing the cake pops well ahead, adding delicate decorations closer to the event can help protect them from damage during storage.
When to Package Them
Package completely cooled and set cake pops after the decorations are secure.
Keep the packages upright and protected until they’re ready to be displayed or handed to guests.
Frequently Asked Questions
How do you make pearl cake pops?
Bake and cool a vanilla cake, crumble it, and mix it with enough frosting to hold the crumbs together. Shape the mixture into balls, add cake-pop sticks, chill, dip in white or ivory candy coating, and finish with edible pearls and other bridal decorations.
What are the best cake flavors for wedding cake pops?
Vanilla is a versatile choice because its mild flavor pairs well with many frostings and decorations. Other options include chocolate, lemon, almond-inspired flavors, and white chocolate-inspired combinations.
Can I make wedding cake pops ahead of time?
Yes. Cake pops can be prepared in stages. For the best results, protect them from heat, moisture, and pressure, and consider adding particularly delicate decorations closer to the wedding.
How long do homemade cake pops last?
Storage time depends on the cake, frosting, coating, and decorations used. Follow the storage requirements for the ingredients in your particular recipe.
Can cake pops be used as wedding favors?
Absolutely. Individually packaged cake pops make attractive, portion-sized wedding favors. Add ribbon and a personalized tag to coordinate them with the wedding.
How do you attach edible pearls to cake pops?
Add the pearls while the coating is still slightly soft. If the coating has already set, use a small amount of suitable melted candy coating as edible glue.
How do you transport cake pops to a wedding?
Keep them upright in a sturdy container with enough space to prevent them from touching or rolling around. Protect delicate decorations and keep the container away from heat.
Can I freeze decorated cake pops?
It is generally easier to freeze undecorated cake pops. Delicate decorations may be damaged during freezing and thawing, and condensation can affect the finished appearance.
What color cake pops look best at a wedding?
White and ivory are timeless choices. Pearl, champagne, blush, gold, and silver accents can then be added to coordinate with the wedding palette.
How many cake pops should I make for a wedding?
The number depends on the size of the wedding and what other desserts you’re serving. If cake pops are one of several desserts, you may need fewer per guest than if they’re the primary individual dessert. It’s also helpful to account for a small number of extras for breakage or unexpected guests.
Final Thoughts
Pearl wedding cake pops are a simple way to give a homemade dessert an elegant bridal makeover.
Starting with an uncomplicated vanilla cake-pop base, you can completely change the finished appearance with four details:
coating + pearls + ribbon + flowers.
Keep everything white and pearl for a classic wedding, add blush for a romantic celebration, introduce gold for a luxurious look, or use silver for a modern winter wedding.
Whether they’re arranged on a dessert table, displayed at a bridal shower, or packaged as individual wedding favors, these elegant cake pops can add a personal homemade touch to the celebration while still looking beautifully coordinated with the rest of the wedding.