Halloween cake pops are one of the easiest ways to turn an ordinary homemade dessert into something festive, fun, and party-ready. With colorful candy coating, candy eyes, sprinkles, and a few simple decorations, you can transform cake pops into adorable ghosts, pumpkins, mummies, bats, black cats, and more.
Whether you’re planning a Halloween party, a kids’ birthday celebration, a school gathering, or a cozy fall get-together, these cute Halloween cake pops make an eye-catching addition to any dessert table. They’re also easy to customize, so you can make them cute and playful, spooky and creepy, or elegant enough for an adults-only Halloween party.
The best part? You don’t need to be an expert cake decorator. Many of these Halloween cake pop ideas use simple shapes and easy decorating techniques, making them perfect for beginners.
So grab your favorite cake flavor, some candy melts, and plenty of candy eyes, and get ready to make the cutest spooky treats of the season!
Why You’ll Love These Halloween Cake Pops
There are plenty of reasons to add Halloween cake pops to your fall baking list.
- They’re incredibly cute. Ghosts, pumpkins, monsters, and little bats make these treats instantly festive.
- They’re customizable. Change the colors, decorations, and cake flavors to match your party.
- They’re great for kids and adults. Use playful designs for children or sophisticated black-and-gold decorations for an adult gathering.
- They’re perfect for parties. Cake pops are individually portioned and easy for guests to pick up and enjoy.
- They’re a fun decorating project. Kids can help add candy eyes, sprinkles, and other simple decorations.
- They can be made ahead. Preparing them in advance makes Halloween party planning much easier.
- They look beautiful on a dessert table. Arrange several designs together for an impressive Halloween display.
Ingredients You’ll Need
You only need a handful of basic ingredients to make homemade Halloween cake pops.
For the Cake Pop Base
- Vanilla cake
- Chocolate cake
- Buttercream frosting
- Cake pop sticks
You can use a homemade cake or a boxed cake mix. Vanilla and chocolate are both excellent choices, but you can also experiment with pumpkin spice, red velvet, or your favorite seasonal cake.
For the Halloween Coating
Choose candy melts or another cake-pop-friendly coating in festive colors such as:
- Orange candy melts
- White candy melts
- Black candy melts
- Purple candy melts
- Milk or dark chocolate
- Green candy melts
- Yellow candy melts
You don’t need every color. A combination of two or three shades can create a cohesive Halloween theme.
For Decorating
Keep a variety of small decorations nearby so you can mix and match designs.
- Candy eyes
- Halloween sprinkles
- Black and orange sugar
- Edible pearls
- Colored sanding sugar
- Mini chocolate candies
- Melted candy melts for drizzling
- Chocolate chips
- Edible glitter
- Small Halloween candies
For intricate designs, you can also use a small piping bag or parchment cone filled with melted chocolate or candy coating.
How to Make Halloween Cake Pops
The basic cake pop process is simple. Once you have the base made, you can turn it into almost any Halloween design.
1. Bake and Cool the Cake
Start with your favorite cake recipe or boxed cake mix. Bake the cake according to the recipe instructions and let it cool completely.
This step is important. If the cake is still warm, the frosting can melt and create a mixture that is too soft to shape.
2. Crumble the Cake
Once the cake has completely cooled, break it into pieces and crumble it into fine, even crumbs.
Remove any particularly hard edges if necessary. You want a soft, uniform texture that will combine easily with the frosting.
3. Mix in the Frosting
Add a small amount of buttercream frosting to the crumbs and mix.
Don’t add too much frosting at once. The mixture should be moist enough to hold together when pressed, but it shouldn’t feel wet or overly sticky.
If you can roll the mixture into a ball without it cracking or falling apart, you’ve reached the right consistency.
4. Shape the Cake Pops
Roll the mixture into evenly sized balls.
For party desserts, keeping the cake pops approximately the same size makes the finished display look much more polished.
If you’re making pumpkins, ghosts, or other shaped Halloween cake pops, gently adjust the shape before chilling.
5. Chill the Cake Pops
Place the shaped cake pops in the refrigerator for about 20–30 minutes, or until they’re firm.
You want them chilled enough to hold their shape but not frozen solid.
6. Melt the Candy Coating
Melt your candy melts according to the package directions.
For a smooth coating, stir regularly and avoid overheating the candy. If the coating seems too thick, use a small amount of a candy-melting thinner designed for this purpose.
7. Dip the Cake Pops
Dip the end of each cake pop stick into a little melted coating before inserting it into the cake ball.
Then dip the cake pop into the coating, covering it evenly.
Gently tap the stick against the edge of the bowl to remove excess coating.
8. Add Halloween Decorations
Decorate the cake pop while the coating is still wet.
Add candy eyes, sprinkles, chocolate details, sugar, or drizzled coating depending on the design.
For decorations that need to be attached after the coating sets, use a tiny amount of melted chocolate or candy coating as edible “glue.”
Allow the finished cake pops to set completely before packaging or serving.
15 Halloween Cake Pop Ideas
Now comes the fun part! These Halloween cake pop ideas range from incredibly easy designs to slightly more detailed creations.
You can make an entire batch using one design or mix several styles together for a fun Halloween dessert table.
1. Ghost Cake Pops
Ghost cake pops are one of the easiest Halloween designs and one of the cutest.
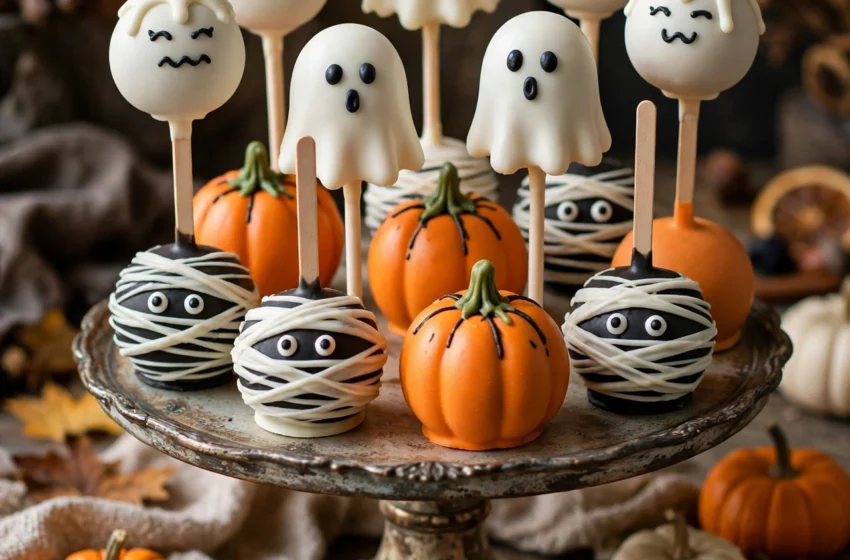
Dip your cake pops in white candy melts and add two small candy eyes before the coating sets. For an extra ghostly effect, use the coating to create a slightly irregular bottom edge or add simple black details.
For a cute Halloween look, keep the faces simple and friendly.
Easy decorating tip: Use different sizes of candy eyes to give each ghost a slightly different personality.
2. Pumpkin Cake Pops
Pumpkin cake pops are perfect for Halloween and fall parties.
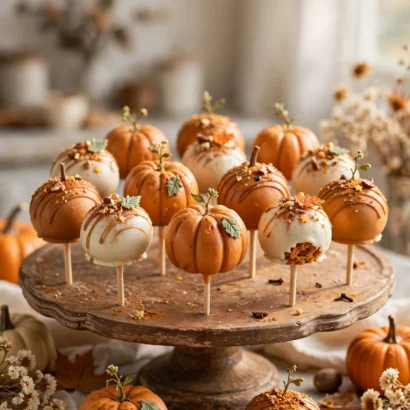
Start with orange candy coating and shape the cake balls slightly so they’re more pumpkin-like. Once coated, use a toothpick or thin decorating tool to create subtle vertical lines.
Finish with a tiny green stem made from candy, chocolate, or green candy coating.
These pumpkin cake pops look especially cute arranged in groups on a Halloween dessert table.
3. Black Cat Cake Pops
Turn ordinary cake pops into adorable black cats with black candy coating, candy eyes, and tiny ears.
You can create the ears from small pieces of chocolate, fondant, or candy coating. Add a tiny pink or orange detail for the nose if desired.
Black cat cake pops are especially fun when paired with orange pumpkin cake pops.
4. Mummy Cake Pops
Mummy cake pops are surprisingly easy because the design doesn’t need to be perfectly neat.
Dip each cake pop in white candy coating. Once the coating has set slightly, drizzle thin lines of white coating across the cake pop in different directions.
Leave two candy eyes peeking through the “bandages.”
The slightly messy appearance is part of the charm, so don’t worry about making every line perfect.
5. Bat Cake Pops
For bat cake pops, use dark chocolate or black candy coating.
Add small bat-shaped decorations to the sides or create simple bat wings from chocolate.
You can also use a bat-shaped candy or sprinkle if you want a shortcut.
For a more sophisticated Halloween party, pair black bat cake pops with black-and-gold decorations.
6. Spiderweb Cake Pops
Spiderweb cake pops are perfect if you want something spooky but elegant.
Coat the cake pops in black chocolate or candy melts. Once the coating has set, drizzle thin white lines over the surface.
Start with several circles and gently drag a toothpick from the center outward to create a web effect.
Finish with a tiny candy spider if desired.
These would make an especially striking addition to an adult Halloween dessert table.
7. Candy Corn Cake Pops
Candy corn cake pops recreate the classic Halloween candy in cake-pop form.
Use yellow, orange, and white decorations to create the familiar candy corn color combination.
You can make the cake pop itself white and decorate it with bands of yellow and orange, or simply use the three colors as inspiration for the coating and sprinkles.
They’re bright, cheerful, and perfect for a traditional Halloween theme.
8. Monster Cake Pops
Monster cake pops are ideal for kids because there are no strict decorating rules.
Use bright colors such as purple, green, orange, and blue. Add one, two, three, or even several candy eyes.
You can add chocolate teeth, sprinkles, eyebrows, or silly expressions.
The more unusual each monster looks, the better.
9. Witch Hat Cake Pops
Witch hat cake pops are a fun choice when you want something a little more elaborate.
Use purple or black candy coating and add a small orange band around the cake pop.
You can create a pointed witch-hat effect with chocolate or shaped candy decorations.
For a simple version, keep the cake pop round and use a miniature witch-hat decoration on top.
10. Frankenstein Cake Pops
Frankenstein cake pops are instantly recognizable and work beautifully with green candy melts.
Dip the cake pops in green coating, then add candy eyes and create Frankenstein’s signature dark hair with melted chocolate.
A few simple black lines can create eyebrows, a mouth, and the famous neck details.
This is another excellent design for Halloween treats for kids.
11. Eyeball Cake Pops
Eyeball cake pops are spooky without requiring complicated shapes.
Cover the cake pop in white coating. Add a colorful candy or circle of icing for the iris, followed by a smaller black center.
Use red decorating gel or thin red candy coating to create veins if you want a creepier effect.
For a cute version, skip the veins and use brightly colored irises.
12. Skeleton Cake Pops
Skeleton cake pops are a fun option for older kids and adults.
Start with white candy coating and add simple black details for the eyes, nose, and mouth.
You don’t need to create a detailed skull. A few recognizable features are enough to make the design work.
For an elegant Halloween party, use white chocolate with very thin dark chocolate details.
13. Chocolate Pumpkin Cake Pops
Combine a rich chocolate cake center with a bright orange pumpkin coating for a delicious seasonal contrast.
Shape the cake balls into slightly flattened pumpkin forms and add orange coating.
Use green candy or chocolate for the stem.
The dark chocolate center makes these pumpkin cake pops especially appealing for chocolate lovers.
14. Cute Witch Cake Pops
Instead of making a scary witch, create a friendly, colorful Halloween character.
Use purple, orange, black, and cream decorations. Add candy eyes and a tiny witch hat or simple hair details.
This design works particularly well for children’s Halloween parties because it feels festive without being frightening.
15. Black and Orange Halloween Cake Pops
For a simple and stylish Halloween look, stick to the classic combination of black and orange.
Make some cake pops orange and others black, then decorate them with simple stripes, sprinkles, spiderwebs, pumpkins, or gold details.
This design is especially suitable for adult Halloween parties because it can look sophisticated without requiring complicated decorating techniques.
How to Make Cute Halloween Cake Pops
Not everyone wants their Halloween desserts to look scary.
If you’re creating a cute Halloween dessert table, focus on friendly characters, soft colors, and simple decorations.
Try combinations such as:
- Pastel orange and cream
- Soft purple and white
- Peach and black
- Cream and chocolate
- Muted orange and lavender
Friendly candy eyes instantly make spooky characters look more playful.
Simple ghosts, miniature pumpkins, smiling monsters, tiny bats, and sweet witch designs are all excellent choices.
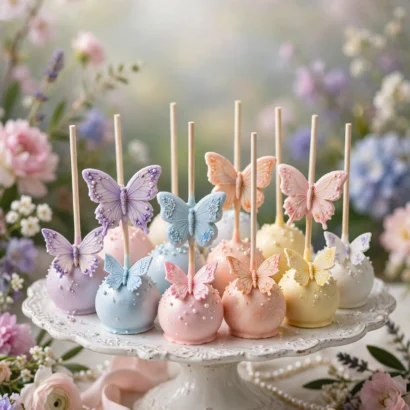
You can also use pastel Halloween decorations instead of traditional neon orange and black. This creates a softer aesthetic that’s especially popular for children’s parties, baby-friendly gatherings, and Pinterest-style dessert tables.
Halloween Cake Pops for Kids
Halloween cake pops are perfect for kids because they’re colorful, individual, and easy to customize.
They’re great for:
- School Halloween parties
- Classroom celebrations
- Halloween birthday parties
- Trick-or-treat gatherings
- Halloween movie nights
- Family Halloween parties
When making treats for children, choose designs that are simple enough to decorate together.
Easy Designs for Kids
Start with:
- Ghosts
- Pumpkins
- Monsters
- Candy corn
- Friendly witches
Children can help add candy eyes, sprinkles, sugar, and other decorations.
More Advanced Designs
If you’re comfortable with cake decorating, try:
- Mummies
- Spiderwebs
- Frankenstein
- Witch hats
- Skeletons
For younger children, it’s best to have an adult handle the dipping and detailed decorating while kids help with the finishing touches.
Halloween Cake Pops for Adults
Halloween desserts don’t have to be childish.
For an adults-only Halloween party, choose darker colors and more sophisticated decorations.
Try combinations such as:
- Dark chocolate and orange
- Black and gold
- Black and cream
- Muted purple and chocolate
- Orange and white
Minimalist pumpkins, delicate spiderwebs, black cake pops with gold sprinkles, and chocolate-drizzled designs can all look elegant on a Halloween dessert table.
You can also use a mixture of cake flavors, such as chocolate, vanilla, pumpkin spice, or red velvet.
Halloween Cake Pop Color Ideas
The color palette you choose can completely change the look of your Halloween treats.
Classic Orange & Black
The traditional Halloween combination. Perfect for parties, trick-or-treat gatherings, and classic Halloween themes.
Black & White
Simple and sophisticated. Add spiderwebs, skeleton details, or minimalist decorations.
Purple & Orange
A playful alternative to traditional Halloween colors.
Chocolate Brown & Orange
Warm, rich, and perfect for fall gatherings.
Cream & Pumpkin
A softer take on Halloween that’s ideal for a cozy autumn aesthetic.
Black & Gold
Perfect for an elegant adult Halloween party.
Pastel Halloween
Use soft lavender, pale orange, cream, peach, and light pink for a cute and modern Halloween dessert table.
How to Display Halloween Cake Pops
Even the simplest cake pops can look impressive when displayed thoughtfully.
Halloween Dessert Table
Arrange several cake pop designs on a decorated dessert table alongside cupcakes, cookies, brownies, and Halloween candy.
Use a consistent color palette so the display looks intentional rather than overly busy.
Tiered Cake Pop Stand
A tiered stand gives your cake pops height and makes individual designs easier to see.
Mix different designs throughout the stand rather than grouping every design together.
Pumpkin-Themed Display
Place cake pops around miniature pumpkins, gourds, and other fall decorations.
This works especially well for an autumn-inspired Halloween party.
Individual Party Favors
Wrap each cake pop in a clear treat bag and tie it with Halloween ribbon.
Guests can take them home as party favors.
Halloween Treat Boxes
Place one or two cake pops inside small Halloween-themed boxes.
This is a great option for school parties, birthday celebrations, and neighborhood gatherings.
Trick-or-Treat Dessert Station
Set up a small station with individually packaged cake pops so guests can grab one as they arrive or leave.
For the table itself, consider coordinating your cake pops with:
- Halloween tablecloths
- Mini pumpkins
- Black or orange ribbons
- Halloween candy
- Faux flowers
- Small signs
- Seasonal decorations
Halloween Cake Pops for a Party
Cake pops work beautifully as part of a larger Halloween dessert table.
Instead of making an entire dessert table from cake pops alone, mix several textures and shapes.
Pair them with:
- Halloween cupcakes
- Brownies
- Halloween cookies
- Caramel apples
- Popcorn
- Chocolate-covered pretzels
- Halloween candy
For the best visual effect, choose a consistent color palette.
For example, a black, orange, and cream dessert table could include orange pumpkin cake pops, black cat cake pops, chocolate brownies, cream-colored cookies, and orange candy.
This creates a cohesive Halloween party dessert display without requiring every dessert to look identical.
Tips for Perfect Halloween Cake Pops
Why Are My Cake Pops Falling Off the Sticks?
This usually happens when the cake mixture is too soft, the cake pops are too heavy, or the sticks haven’t been secured properly.
Dip the end of the stick into melted coating before inserting it into the cake ball. Then chill the cake pops until firm before dipping.
Why Is My Coating Cracking?
Cracking can happen when there is a large temperature difference between the chilled cake pop and the warm coating.
Let the cake pops sit for a few minutes before dipping and avoid making the coating excessively hot.
How Do I Get Smooth Cake Pops?
Make sure the cake mixture is evenly combined and roll the balls smoothly before chilling.
When dipping, use a sufficiently deep container so the entire cake pop can be coated in one motion.
How Do I Attach Candy Eyes?
Place candy eyes onto the wet coating before it sets.
If you’re adding them later, use a tiny dot of melted chocolate or candy coating as edible glue.
How Do I Make the Decorations Stay in Place?
Add decorations while the coating is still slightly wet whenever possible.
For decorations that need to be added after the coating has set, use a small amount of melted candy coating.
How Do I Make Halloween Cake Pops Ahead of Time?
You can prepare the cake pop centers in advance and store them in an airtight container.
Decorating them closer to the event can help keep delicate decorations looking fresh.
How Do I Transport Decorated Cake Pops?
Allow the coating to set completely before moving the cake pops.
Place them upright in a cake pop stand, sturdy box, or container designed to keep them from touching one another.
How to Store Halloween Cake Pops
Proper storage helps keep your homemade cake pops fresh and attractive.
Room Temperature
If your cake pop recipe and ingredients allow it, decorated cake pops can generally be kept at room temperature in a cool, dry environment.
Keep them away from direct sunlight and heat, especially if the coating or decorations can soften.
Refrigerator
If refrigeration is needed, store the cake pops in an airtight container.
Allow refrigerated cake pops to come closer to room temperature before serving if condensation becomes an issue.
Freezer
Cake pops can also be frozen, particularly when you want to prepare the cake centers ahead of time.
Wrap them carefully and place them in a freezer-safe airtight container.
For the best appearance, delicate decorations are often better added after thawing.
Individual Packaging
For party favors, place each completely set cake pop into an individual treat bag and secure it with ribbon or a twist tie.
This keeps the treats protected and makes them easy for guests to take home.
Can You Make Halloween Cake Pops Ahead of Time?
Yes! Halloween cake pops are a convenient make-ahead dessert for parties.
One Day Before Halloween
This is an ideal time to finish decorating your cake pops.
Store them properly and keep them protected from heat and moisture.
Two to Three Days Before
You can prepare the cake pop centers and, depending on the recipe and decorations, finish the cake pops several days before your event.
Keep them in an airtight container and follow the storage requirements of your specific ingredients.
Freezing
If you need to prepare even further ahead, freeze the cake pop centers before decorating.
Once thawed and properly chilled, coat and decorate them as usual.
Decorating Ahead
Simple decorations such as sprinkles and candy eyes generally hold up well when stored properly.
More delicate details may be better added closer to serving time.
Packaging Ahead
You can also prepare treat bags, ribbons, labels, and display materials in advance.
That way, on the day of your Halloween party, you only need to arrange the finished desserts.
Frequently Asked Questions
How do you make Halloween cake pops?
Bake and cool a cake, crumble it into fine crumbs, mix it with enough frosting to hold together, shape the mixture into balls, chill them, insert cake pop sticks, dip them in melted candy coating, and decorate.
What are the easiest Halloween cake pop designs?
Ghosts, pumpkins, monsters, candy corn, and simple black-and-orange cake pops are some of the easiest designs for beginners.
Can I make Halloween cake pops without a mold?
Yes. You can easily make round cake pops by hand without a mold. Many Halloween designs, including ghosts, pumpkins, mummies, and monsters, can be created with simple hand shaping.
How far ahead can I make Halloween cake pops?
Depending on the recipe, storage conditions, and decorations, cake pops can generally be prepared ahead of your event. For the freshest appearance, make delicate decorations closer to serving time.
How do I keep cake pops from falling off the sticks?
Make sure the cake mixture isn’t too soft, chill the shaped cake pops, and dip the end of each stick into melted coating before inserting it into the cake.
Can I freeze Halloween cake pops?
Yes. Cake pop centers can be frozen for later decorating. Wrap them well and store them in an airtight freezer-safe container.
How long do homemade cake pops last?
Their shelf life depends on the ingredients used and how they’re stored. Follow the storage recommendations for your specific cake, frosting, and coating, and keep them protected from heat and moisture.
What is the best cake flavor for Halloween cake pops?
Chocolate and vanilla are classic choices. Pumpkin spice, red velvet, and chocolate pumpkin are also excellent flavors for Halloween.
How do I make spooky cake pops for kids?
Use friendly designs and colorful decorations. Ghosts, pumpkins, monsters, candy corn, and cute witches are great choices when you want Halloween treats that aren’t too scary.
What can I use instead of candy melts for cake pops?
Chocolate or other suitable confectionery coatings can be used depending on the recipe. Choose a coating that melts smoothly and sets firmly enough to create an even shell around the cake pop.
Final Thoughts
Halloween cake pops can be cute, spooky, elegant, colorful, or creepy depending on how you decorate them.
The easiest way to create an impressive Halloween dessert table is to mix several designs rather than making every cake pop identical. Pair friendly ghosts with pumpkins, mummies with black cats, or bright monsters with classic candy corn designs.
You can also change the color palette to match your party. Traditional orange and black create a classic Halloween look, while cream, purple, and pastel orange can give your dessert table a softer, more modern feel.
Whether you’re making Halloween treats for kids, preparing party favors, or creating a sophisticated dessert table for adults, these Halloween cake pop ideas give you plenty of inspiration.
Pick your favorite designs, gather your candy eyes and colorful decorations, and have fun creating your own collection of cute spooky cake pops for Halloween!